Background
Dokku is a Docker powered mini-Heroku. Once it's installed on a server you can perform git push style deployments to your own private PaaS (Platform as a Service).
In this post we'll go over how to set it up on a $10/mo 1GB DigitalOcean droplet.
Note: At the time of this writing, both Dokku and Docker are still in beta and not meant for production usage.
Domain and Server Provisioning
Register a Domain Name
If you already have a domain name you'll be using, then you can skip this step. If not, then go register one (I use Namecheap).
For the purposes of this post I'll be using the domain for this site "launchbylunch.com".
DNS
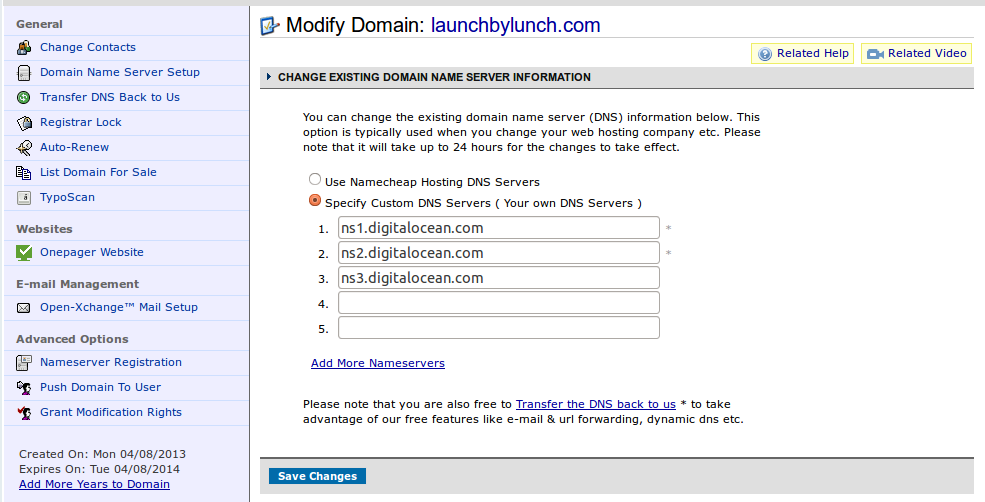
Once you have your domain name, edit your name servers to use DigitalOcean's. On Namecheap, once you've clicked on the management page for your domain, you can find the nameserver menu under Domain Name Server Setup on the left.

Alternatively, you can stick to using your registrar's nameservers and setup the wild card CNAME handle in the next section there. Doing it through DigitalOcean is just a bit easier as they'll already have your server details.
Note: Either way it may take up to an hour for your DNS changes to propagate.
SSH
SSH Key Creation
We'll be using SSH to connect to our server and it's a best practice to use SSH keys for authentication rather than passwords. Generate a new pair of SSH keys for use with your DigitalOcean account by running ssh-keygen on your local machine.
It'll prompt you for a name for the SSH key files (specify id_rsa_digital_ocean) and a passphrase (pick something long you can remember) to secure the private key file.
It should look something like this:
$ ssh-keygen
Generating public/private rsa key pair.
Enter file in which to save the key (/home/sehrope/.ssh/id_rsa): id_rsa_digital_ocean
Your identification has been saved in id_rsa_digital_ocean.
Your public key has been saved in id_rsa_digital_ocean.pub.
The key fingerprint is:
e2:44:e3:0b:52:86:40:2a:bd:5d:63:70:a3:88:01:ef sehrope@ls01
I like to keep all my SSH keys in the ~/.ssh directory so to lets move them there:
$ mv id_rsa_digital_ocean* ~/.ssh/.
SSH Config
Normally, to log in to a server using an SSH key you need to specify it on the command line via -i. Rather than specifying it everytime, you can also add default SSH settings to your SSH config file, ~/.ssh/config.
Edit the file (or create it if it doesn't exist) and add an entry for your domain name:
Host launchbylunch.com
  User root
  IdentityFile ~/.ssh/id_rsa_digital_ocean
Now, whenever I SSH to launchbylunch.com it'll default to using that specific SSH key file for authentication. I've also specified the default user to connect to on the remote server.
As an added bonus, if you have shell completions setup properly then you can just type ssh l and then hit tab and it'll autocomplete server names for you.
DigitalOcean
If you haven't done so already, create an account with DigitalOcean.
Next, from the account menu click SSH Keys. Then pick and name for your key and copy/paste the public key file (~/.ssh/id_rsa_digital_ocean.pub) into the text box and save it.
Create a new droplet
Log in to DigitalOcean and the Create buton to create a new droplet.
- The default size is 512mb, change it to 1GB
- If you'd like pick a region that is closer to you.
- Select the Ubuntu 13.04 x64 image
- Click to select the SSH key you added.
- Click Create Droplet
In about a minute the droplet should be created. Make a note of its IP address.
DigitalOcean DNS
The final part of our setup will be to setup a wildcard DNS entry for our domain.
From the main DigitalOcean menu click DNS then:
- Enter your domain (ex: launchbylunch.com)
- Click to select the droplet you just created
- Click CREATE DOMAIN
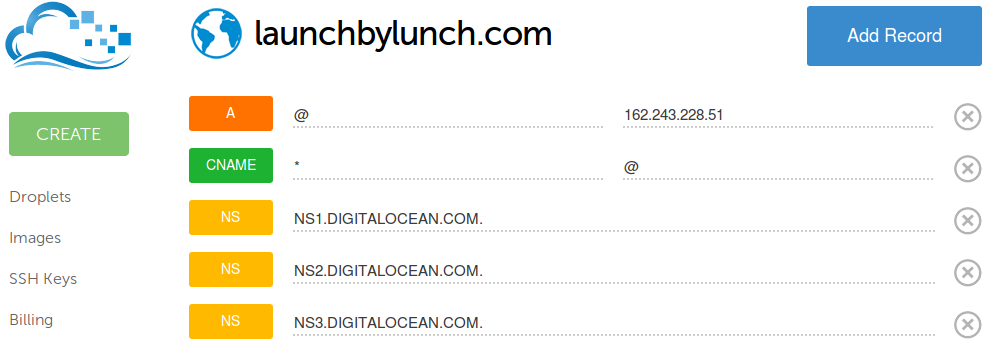
This will create a DNS A record for your root domain pointing to your newly created droplet. To allow apps to be hosted on the sub domain, we'll need to add a wildcard CNAME entry. From the DNS menu of your domain:
- Click Add Record
- For Record Type select CNAME
- For the Name enter
* - For the Hostname enter
@ - Click CREATE
Once you've completed this step it should look something like this:

Connect to the droplet
Now let's see if everything is setup properly. From the command line try to connect to it via SSH:
$ ssh launchbylunch.com
If everything is setup properly then you should be connected. If not, then it's possible your DNS has not propagated yet. Use either nslookup or dig to verify if your DNS has propagated:
$ nslookup launchbylunch.com
Non-authoritative answer:
Name: launchbylunch.com
Address: 162.243.228.51
To check the wildcard CNAME, prefix anything in front of your domain:
$ nslookup foobar.launchbylunch.com
Non-authoritative answer:
foobar.launchbylunch.com  canonical name = launchbylunch.com.
Name: launchbylunch.com
Address: 162.243.228.51
Server Setup
Update System Packages
Now that you're connected to your server first update and upgrade your system packages. If you followed the instructions thus far then you'll be logged in as root and will not need to prefix your commands with sudo.
To update your droplet run:
$ apt-get update && apt-get -y upgrade
After the first update I like to reboot the server once to make sure everything is working fine. From the command line run:
$ reboot
Install Dokku & Docker
Once your server reboots connect again via SSH. We'll now be installing the latest development version of Dokku directly from GitHub:
# Copy the installation script locally:
$ wget -qO- https://raw.github.com/progrium/dokku/master/bootstrap.sh > dokku-setup.sh
# Run it:
$ bash dokku-setup.sh
This will take a few minutes. Once it completes, Docker and Dokku will be installed on your droplet and a dokku user will have been created. This dokku user will handle your app deployments.
Next, from your local machine (not the droplet terminal) add your SSH key to the remote dokku user. The last parameter me@mycomp is a descriptive name so put whatever you'd like there.
$ cat ~/.ssh/id_rsa_digital_ocean.pub | ssh launchbylunch.com "sudo sshcommand acl-add dokku me@mycomp"
Sample Application
Create
To test out your new private PaaS let's create a project. We'll use the Heroku Node.js sample application. Run the following on your local machine to clone it:
$ git clone https://github.com/heroku/node-js-sample
$ cd node-js-sample
Then, add your new Dokku powered PaaS as a git remote:
$ git remote add production dokku@launchbylunch.com:my-new-app
Deploy
Finally, to push your application to your private PaaS:
$ git push production master
If everything is setup properly, then Dokku should receive the git push and start building your app. Once it's completed it will print something like this:
-----> Deploying my-new-app ...
=====> Application deployed:
       http://my-new-app.launchbylunch.com

To dokku@launchbylunch.com:my-new-app
 * [new branch]      master -> master
Run
If everything deployed properly, then you should be able to test out your newly deployed app.
Open the link for your app an you should see Hello World!.
To deploy a new version, simply commit it locally and push the changes again via git.
Logs
By default Dokku apps send all logging output to stdout. This gets saved by Docker to a single file per container. To see your application logs, SSH to your server and run:
$ dokku logs my-new-app
More information
In a later post I'll go into a Dokku plugin that allows you to run multiple process types as well as a better way to deal with logging.
Are you building something cool with Docker or Dokku? Tell me about it.